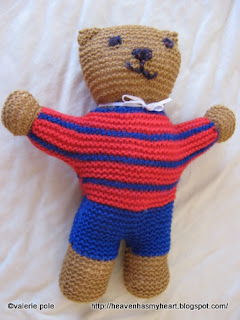
Recently our Acts of Love Group started a project to provide teddy’s to the youngest orphans as part of our Christmas in a Box program. Last year Acts of Love distributed Christmas Box gifts to over 800 orphans in the Midrand area. If you want to become involved with this particular project you can find the details on Facebook here: Acts of Love. I was motivated to knit a Teddy for this project when I heard it reported that on a recent visit to a particular orphanage, one of the Acts of Love co-ordinators described how a 3 year old girl in the orphanage picked up a brick off the ground and crooned to it, playing with the brick as if it were a doll. Heartbreaking. So a few of us felt inspired to knit at least one (more for the more productive knitters) teddy for a needy child.
 |
| Trauma Teddy will give a little one so much love! |
Trauma Teddy Pattern
This pattern has been adapted from a pattern designed to distribute to child trauma victims. Teddies can be made in a variety of styles. The pattern describes a teddy with pants and a shirt, but the pattern can be varied. The important thing is that the teddy has a personality of its own!
Double ply wool. (No mohair or angora).
Needles: No 9 (3.75 mm) or no 10 (3.25mm) needles. (Loose knitters use No 10)
Legs and Pants
Leg 1
• Cast on 12 stitches
• Knit 24 rows
• Change colour for pants
• Knit 8 rows
• Leave stitches on needle
Leg 2
• Same as Leg 1
Pants
• Join both legs by knitting across both legs
• Knit 14 rows to finish pants
Shirt
• Change colour for shirt
• Knit 12 rows
Sleeve
• Cast on 12 stitches at beginning of next 2 rows
• Knit 18 rows
• Next 2 rows cast off 12 stitches (this forms the arms, 24 stitches remain)
Head
• Knit 34 rows. Cast off.
Hands
• Using same colour as for face and leg, cast on 10 stitches, knit 10 rows, cast off (x2)
Repeat this procedure to obtain the other side of the Trauma Teddy
(I did fewer rows, I made the legs shorter. Fine as long as both sides match)
Finishing
• Sew on face.
• Join up leaving a gap at top of the head for filling.
• Fill with filling.
• Sew top of head together.
• Gather around the base of head to form neck.
• Pinch corners of head and sew to form ears.

No comments:
Post a Comment